An Add to Calendar button in WordPress allows visitors to save events from your website directly to their own Google Calendar. This is useful for websites that publish classes, meetings, webinars, appointments, community events, or any other time-based activities.
With the Simple Calendar Google Calendar plugin for WordPress, you can add this functionality to your calendar using the built-in [add-to-gcal-link] event template tag. You can also display the button by adding a standard HTML <button> element inside the tag. Once added, the button appears within the event details. When a visitor clicks it, they are redirected to Google Calendar, where they can review the event information and add it to their own calendar.
The process works as follows:
- A visitor views the calendar on your website.
- They hover over or open an event to view its details.
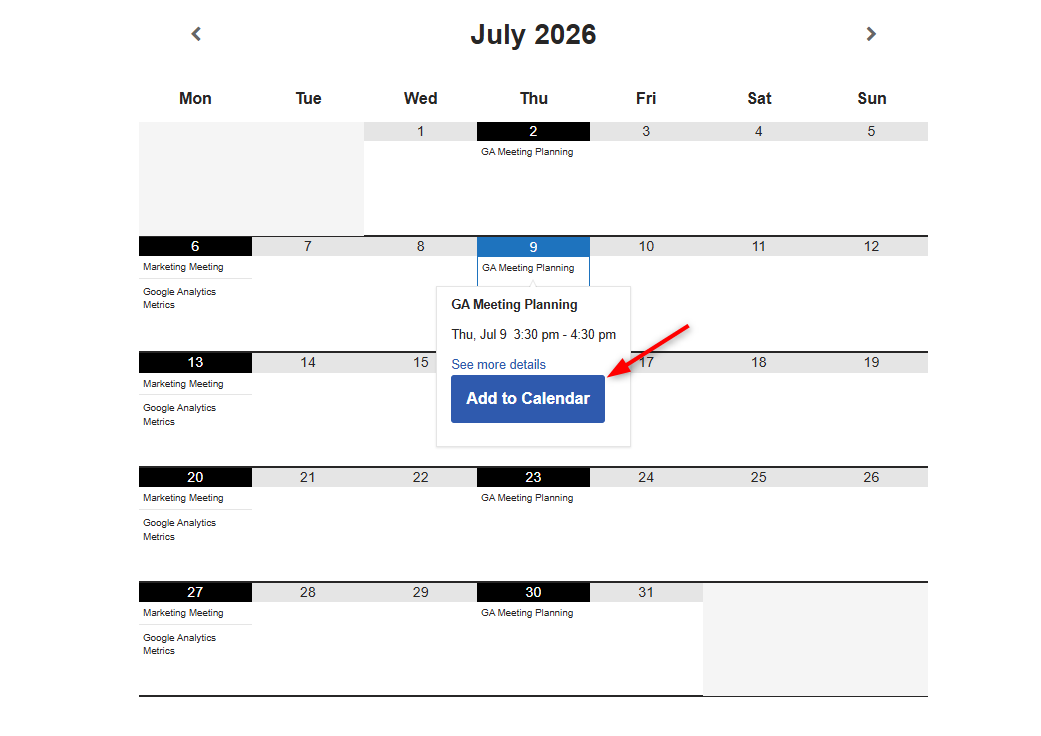
- An Add to Calendar button appears in the event details.
- The visitor clicks the button.
- Google Calendar opens with the event details ready to be added.
- The visitor reviews the information and saves the event to their calendar.
This provides a convenient way for visitors to save events without manually copying the event title, date, time, and other information.
The Tag to add the Add to Calendar Button
Simple Calendar provides the [add-to-gcal-link] event template tag for creating a link that redirects visitors to Google Calendar.
To display the link as a button, add a <button> element inside the event template tag:
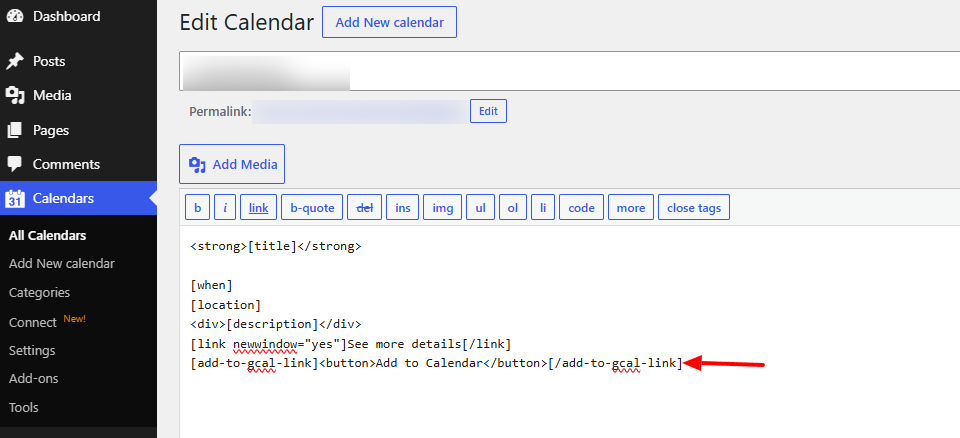
[add-to-gcal-link]<button>Add to Calendar</button>[/add-to-gcal-link]
This renders an Add to Calendar button within the event details.
You can also change the text inside the button to better match your website:
[add-to-gcal-link]<button>Add to Google Calendar</button>[/add-to-gcal-link]
When a visitor clicks the button, they are redirected to Google Calendar, where they can review the event information before adding it to their calendar.
The <button> element uses the default button styling provided by your WordPress theme. Depending on your theme, the appearance of the button may vary.
How to Add the Button to Your Calendar
In order to add an Add to Calendar button to a calendar created with the Simple Calendar plugin, you will need to carry out the following steps:
1. From your WordPress dashboard, go to Calendars.
2. Select the calendar you want to edit.
3. Within the calendar contents section, add the tag to render the button as shown below:
4. Click Update to save your changes.
Once the above is carried out, upon hovering over or clicking an event in your calendar, you should have a a view of the button.
Opening Google Calendar in a New Tab
By default, clicking the Add to Calendar button will open Google Calendar in the current browser tab.
If you want Google Calendar to open in a new browser tab or window, add the newwindow=”yes” attribute to the event template tag so that it is now:
[add-to-gcal-link newwindow="yes"]<button>Add to Calendar</button>[/add-to-gcal-link]
This allows visitors to keep your website open while adding the event to their Google Calendar.
Where to Place the Button
You can place the Add to Calendar button anywhere within the event template.
For example, you may want to display it as the last item as in our example here, or you can even place it after the title.
The exact layout depends on the information you want to display and how your calendar is configured.